Experts explain the most common causes of central air conditioner service failures. Air conditioning systems are vital for indoor comfort, especially during scorching summer days. However, these systems can encounter common issues that require repairs over time.
This guide will explore the most frequent HVAC repairs and provide do-it-yourself (DIY) guidelines to help homeowners tackle these problems effectively. By understanding and addressing these common repairs, homeowners can save money, ensure uninterrupted cooling, and become more self-reliant in maintaining their air conditioning systems.
How to Fix the Most Common Air Conditioning Repairs Yourself
DIY Air Conditioning Service Repair
You may have to wait days or weeks for a technician to repair your central air conditioner during a summer heatwave. It will also cost you a few hundred bucks. If you are comfortable with electricity and are okay with spending less than $100 for parts, it is possible to repair your air conditioner in two hours.
Our local HVAC technicians shared their DIY AC fan maintenance and repair tips. These tips can help you solve the most common problems with “low cooling” or “no cooling.”
A few basic tools are required: a multimeter, a voltage tester, a set of insulated screwdrivers, and a socket.
You’ve already covered the most common problems, so your technician can focus on the harder-to-find problem. You will likely enjoy years of trouble-free air conditioners with the new parts. How to get started.
Why Is My Air Conditioner Not Cooling the House?
Check to Make Sure It’s Not the Furnace
Reduce the temperature on your thermostat and switch it to AC mode. The problem may not be with the furnace if the fan starts. Try resetting your furnace circuit breakers if the fan won’t start. Call a professional if the fan won’t turn on after trying the solutions shown.
Check the condensing unit outside. The fan and compressor should be working. Follow the troubleshooting procedures and repair instructions shown here if you need help.
Attention: Switch Off the Power
Before removing the access panel or pulling out the outdoor disconnect, turn off the furnace and A/C breakers on the main electrical panel. Use a voltage test on the wires that go into the contactor.
AC Doesn’t Work? Purchase Parts
AC contactors (relays) and start/run capacitances (see illustration below) are the most common to fail and are inexpensive. It’s best to install these parts immediately, especially if the air conditioner is older than five years. Condenser motors can also break down, but they cost about $150. Please only buy them if you are sure it’s that.
Find the nameplate of the condensing system (not the furnace) to buy replacement parts. Note the model, serial number, and make (or take a picture). You can purchase the parts from an appliance dealer, online, or at a local furnace dealer.
Discover the Anatomy of a Central Home Air Conditioner
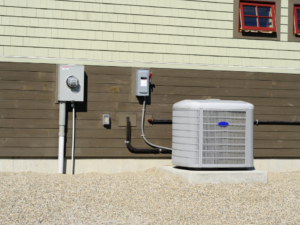
The central home air conditioning service system consists of two main components: the condenser outside and the evaporator (often called an A-coil), located in your furnace’s plenum or air handler. The A-coil moves the heat generated in your home to the outdoor condensing system using the refrigerant. The fan of the condensing device blows air from outside through the condensing coil to remove heat. The condensing units contain three components that DIYers can replace: the AC contactor, start/run capacitors, and the condenser motor. Only a professional can replace the compressor in the condensing units. The A-coil is not serviceable by DIYers.
Shut Off the Power
- Pull the disconnect block out straight by opening the electrical box beside the condensing system.
- Use a voltage detector to check inside the box and ensure the power is turned off.
Clean Condenser Coils
Cleaning the air conditioner condenser is a simple task that can extend the life expectancy of your unit.
- To remove the crud under the lid, aim your garden nozzle up into the top of the condenser coil.
- The coil should be worked all around. Next, aim the nozzle downwards and flush the debris down the coil fins.
- To flush out debris, adjust the nozzle for a gentler flow and spray water directly into the coils.
Test Fuses
Some disconnect blocks have two cartridge fuses. Before you begin repairs, check them. Fuse blowing is an indication of a problem with the condenser unit. Refrain from replacing the fuse; assume you have solved the problem. Replace the parts and install new fuses. Then, fire up the unit. Call a professional if it happens again. You may have more serious problems.
How to Examine the Disconnect Block’s Fuses
- Set your multimeter on the lowest Ohms and touch the black and red leads at opposite fuse ends.
- The fuse will be good if you receive a numerical reading.
- The fuse will be indicated by a zero, a symbol of minus or infinity (∞).
Check the Inside of the Access Panel
The access panel is located along the electrical conduit. Remove the access panel retaining screws, and then remove the panel. Check for rodent nests or signs of chewing on electrical connectors and wires before replacing any parts.
You can discharge the capacitor if you have found broken wires or insulation that has been chewed and can safely perform electrical repairs. Repair the wires, and then clean the nest. Call a professional if you can’t.
How to Discharge a Dual Start/Run Capacitor
- Remove the capacitor from its retaining bracket.
- Touch an insulated screwdriver to the COMMON or “C” and HERM terminals.
- Then, repeat the process between the “C” and “FAN” terminals.
- Make a short on single-mode capacitances by connecting the two terminals.
Replace the Start/Run capacitor(s)
At least one capacitor is found in all air conditioning units. The capacitor is a device that stores electricity and then releases it when the compressor or condenser motors are started. This gives both motors a boost of power. It also smooths out voltage fluctuation to protect the motors of the condenser and compressor.
Over time, capacitors can slowly degrade and provide less power for startup. They can also fail instantly. The gradual failure of capacitors can be unnoticed over a long period, which stresses the motor windings in the compressor and condenser, leading to premature failure. It is worth replacing your capacitors every five years since they are inexpensive.
How to Replace a Capacitor
- Take a picture of the wires (you might need it later).
- Charge the capacitor by releasing the stored energy.
- Use needle-nosed pliers and pull one wire from the old cap. Snap it on the tab corresponding to the new cap. The female crimp connectors must snap firmly onto the tabs of the capacitor.
- Check each connector by wriggling it. Remove the connector if it is not tight. Bend the edges to make it fit better.
- After you have swapped the wires, fix the new capacitor.
Warning: Before disconnecting wires from the capacitor or removing it, discharge them.
Replace the AC Contactor
A $25 AC contactor uses the low-voltage power of the thermostat to switch high-amperage 220-volt current to the condenser and compressor fan. AC contactors are prone to wear and tear, making them the most common cause of air conditioning failures. It is worth replacing your AC contactor every five years, even if it works. Remove the wires from the AC contactor by unscrewing it. Move the wires over to the new unit.
- Remove the connector from the old part and place it in the same position as the new one.
- Where necessary, tighten the connectors.
- Install the new contactor into the condensing device.
How to Test Your Repairs
- Install the access panel, disconnect the block, and reconnect it.
- Set the thermostat at a lower temperature, then turn on the circuit breakers and furnace switches.
- The condenser should be spinning, and the compressor should run.
- The fan motor may be damaged if the compressor turns on, but the fan does not.
- Remove the screws from the condenser lid and turn off the electricity.
- Remove the fan blades and motor by lifting the cover.
- Install the blade and fix the cover.
- Repower the unit, and check if it starts.
- You’ve tried your best, but you should call in a professional if it still doesn’t work out.
Conclusion
You can perform most air conditioning repairs with simple tools and a little knowledge. You can save money and time by following the instructions provided by our professionals. Always turn off the electricity before you begin any repairs. Safety should always be your priority. If these repairs don’t work, or you need more confidence in your skills, seek professional help like AC and Heating Services Houston, TX. Do not sacrifice your comfort in the sweltering summer months. Make sure your air conditioner is working at its peak.
FAQs
What is the most common air conditioner problem?
Inadequate maintenance
The air conditioner may malfunction if the coils and filters are dirty. It is also possible that the compressor and fans will fail too soon.
What safety precautions must be taken when maintaining and repairing an AC unit?
Tool Safety for AC Repair
Wearing protective clothing, such as goggles and breathing masks, having adequate ventilation, avoiding contact with electrical components, and being aware of refrigerant dangers are all part of this.
What are common problems with air handling units?
AHU sensors can develop faults. Actuator OA RA EA Dampers The damper becomes stuck or is moved to a faulty location. There is air leakage in both the fully closed and open positions. The valves for the heating coil (HV), cooling valve (CV), or preheating coil (PV) are stuck, broken, or in an incorrect position.
What are the benefits of air conditioning?
The air conditioning system helps to keep indoor temperatures low. This protects our electronic equipment against heat damage. Maintaining a constant temperature around electrical devices is also easier, preventing them from overheating in the hot summer months.
