Split system air conditioners are a great way to keep your home cool in the summer. These units are quieter, more efficient, and easier to install than central air conditioners. The A/C unit is ductless. You only need to install the cooling unit inside and the compressor, condenser, and power cable outside.
You can install your split system air conditioner if you are familiar with electrical and plumbing work and wish to hire someone other than an expert. The HVAC installation process for each air conditioner is different, depending on the manufacturer.
How to Install a Split System AC
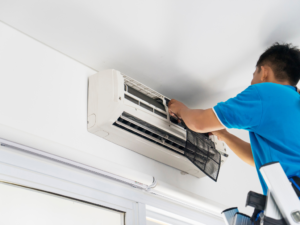
Installing the Indoor Unit
1. Mount the indoor unit in a location not obstructed on your interior wall.
You must cut a wall hole to connect the indoor and outdoor units. Make sure you select a location that allows you to do this. For best results, choose a location away from heat and direct sunlight. Mount the unit at a height of 7 feet (2.1m). There should be 6-12 inches (15-30cm) of space around the unit on all sides to ensure proper airflow.
- Select a wall location that has studs to ensure the unit will be able to withstand the weight.
- Install your unit at least 3.3 feet (1 m) from any antennas or power lines used by televisions, radios, intercoms, or telephones. These sources of electrical noise could affect the operation of your air conditioner.
- Avoid areas where there is a risk of gas leakage or oil mist.
- Many of these units come with remote controls, so you can turn them on and off or adjust the temperature easily, even if mounted high up on the wall.
The living room is a good place to locate the indoor unit.
2. Fix the mounting plate on the interior wall.
The mounting plate should be held against the room wall where the indoor unit will be installed. Make sure the unit is horizontally and vertically straight using a level. Mark the locations of each screw hole with a pencil, remove the plate, and drill the holes into the wall.
- Place the plate in the correct position, insert the plastic anchors, and fasten the plate with tap screws.
3. Drill a hole of 7.6 cm (3 in) through the wall for the pipes.
Mark the center of the hole on the mounting plate. Create a circular opening of 3 in (7.6cm) through the wall using a keyhole drill or drill with a hole-cutting attachment. The opening should slope slightly downward towards the ground for adequate drainage.
- Before drilling or cutting a hole, ensure no wires or pipes are behind the wall.
4. Check electrical connections at the indoor unit.
Remove the front panel of the A/C system. Ensure the wiring matches the diagram provided with the unit and that the cable wires have been attached to the screw terminals.
5. Connect the unit to the pipe and cable after running them through the wall hole.
Electrical tape secures the copper pipes, power cables, and drain pipes. A drain pipe should be placed at the bottom of the unit to allow water to flow freely. The pipes and cable should be run through the wall hole, then secured to the designated locations on the indoor unit according to the instructions.
- You don’t need to add extra insulation because each line is pre-insulated.
- To ensure the unit works well, try to minimize the bending of the pipes and cables.
- Check the instructions included with your kit for more information. For more information, consult the instructions included in your kit.
6. Fix the indoor unit onto the mounting plate.
Align the female connectors on the unit’s back panel to the male connectors on the mounting plate, and then press firmly on both to secure the unit. Be sure to tilt the unit backward 2-3 degrees for water to flow out the drain pipe.
- You may ask a friend to hold the unit while connecting the cables.
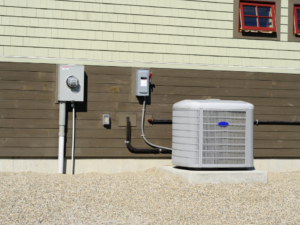
Installing an Outdoor Condenser
1. Place the outdoor unit far away from dusty, hot, or heavily trafficked areas.
Position the exterior unit at least 50 feet (15 meters) away from the hole that you drilled in the mounting plate of the interior unit. This will allow the cable and piping to be easily attached. To ensure the unit functions properly, choose a place with a minimum of 12 inches (30 cm). Select a position protected from wind, dust, and traffic to keep your appliance functioning at its peak.
- Ensure the outdoor condenser has no television or radio antenna within 10 feet (or 3.0 m).
2. Place a concrete slab on the ground.
Do not place the outdoor unit on the ground. It is heavy and can move around on rocks or dirt. Install the condenser onto a concrete pad you can purchase at home improvement shops. Use a level and place the pad where you’d like to install the unit.
Place the concrete pad high enough so the unit is not submerged in water puddles that may form on the ground due to rain or snow.
3. Place the outdoor unit onto the concrete pad.
Set the outdoor condenser on top. Anchor bolts are used to secure the unit on the concrete.
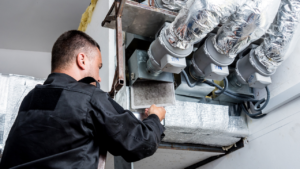
4. Check the wiring of the outdoor unit.
Remove the cover from the condenser. Refer to the unit’s wiring diagram in the instructions manual and ensure that the wires have been connected according to the diagram. Adjust as needed.
- Replace the cover and secure the cables using a cable clamp.
5. Connect the pipe and cable to your outdoor unit.
Use flare nuts to affix two copper pipes from the inside and outdoor units as directed. Connect the interior and outdoor units’ power cables.
- Connect the power supply at last to an outlet.
- Trim the copper pipe if necessary to remove excess.
Complete the Project
1. Bleed out the humidity and air from the circuit.
Connect a vacuum pump to the port of the service valve. Remove the caps on the 3-way and 2-way valves. Turn on the vacuum until it reaches a vacuum absolute of 10mmHg. Close the low-pressure knob, and then turn the vacuum off.
- Disconnect the vacuum and check for leaks in all the joints and valves. Replace the service ports and caps.
2. Utilizing clamps, secure the pipe to the wall.
Attach the clamps in the kit to the outside wall of your house. This will prevent the cables and pipes from moving or becoming disconnected. The manual will tell you how to space the clamps properly.
3. Expanding polyurethane is a great way to seal a hole in drywall.
Spray polyurethane foam expanding into the hole that you drilled for the cable and pipe to pass through the wall. Be sure to seal the hole completely so that hot air and insects cannot escape.
- Follow the instructions on the packaging to let the foam dry before you turn on your air conditioner.
4. Enjoy the cool air by turning on the unit!
You can start the air conditioner from the indoor unit. The cool air should blow into your home within a few minutes.
- If you are having trouble using your air conditioner, consult the manual.
Conclusion
Split system air conditioners are a cost-effective and easy way to keep your home comfortable and cool. Hiring an expert like AC and Heating Services Houston, TX to install your split system air conditioner is best if you still need the certification. Installing and maintaining your split-system air conditioner properly will allow you to enjoy it for many years.
Do your research before hiring a professional to install a split-system air conditioner. Regularly cleaning and maintaining the unit is important for it to operate efficiently. By following these easy actions, you can reduce your energy costs.
FAQs
Can I install my split system air conditioner by myself?
It is best to leave the installation to professionals unless you are certified.
How easy is it to install split-type air conditioning?
They are also more energy-efficient, quieter, and easier to install than central air conditioners. The A/C unit is ductless. You only need to install the cooling unit inside and the compressor, condenser, and power cable outside.
Does split system air conditioning need to be connected to its circuit?
Your air conditioner must have its circuit to avoid overloading circuits and causing safety hazards. Ciner breakers protect your home’s electrical system from overload by shutting it down.
What is the height at which split ACs should be installed?
For optimum cooling in a room 10 feet high, it is recommended that the ceiling be raised 7-8 feet above ground level. The space will experience a uniform distribution of cold air. This will ensure that your air conditioner does not have to work too hard cooling down the roof, which can lead to higher electric bills.
What are the advantages and disadvantages of split-type air conditioning?
Split systems have quiet interior units, but their compressor outside can be noisy. You must consider your neighbors if you live in an area with many people.